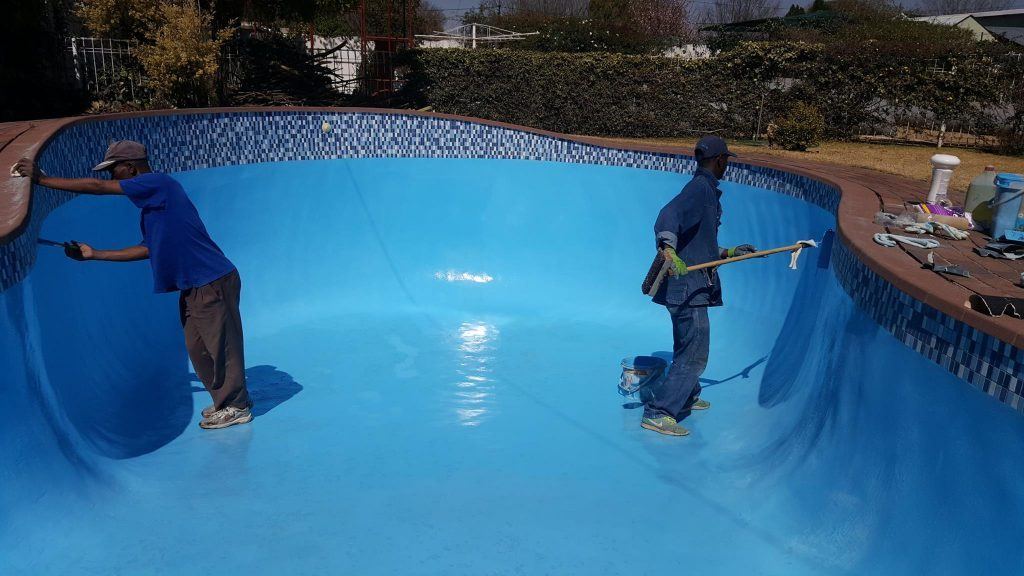
A swimming pool is one of the most important places in a home. Just like the home itself, the pool needs to be maintained regularly, regardless of whether it's an indoor or outdoor swimming pool.
One of the ways you can maintain your swimming pool is by painting it when the need arises. Not only do you get to improve its aesthetics by doing this, but you also get the opportunity to repair chipped pieces of plaster and patch up the cracks that might have built up over time.
This will help to give your pool a brand new look, especially when you decide to incorporate beautiful designs into your painting.
Although pool painting is done by professionals at an expensive rate, it’s DIY-friendly. This means that you can paint your pool by yourself to save money if you’re on a low budget.
It is quite easy to do and you can seamlessly get it done by following the tips and guidelines that will be disclosed in this article.
Things to Consider Before Painting Your Pool
Nature of the pool
Pool painting often depends on the type of pool. The type of paint to be used is determined by the material the pool is made of, whether concrete, metal, or wood.
Seek the advice of an expert
Even though pool painting is DIY-friendly, you must seek the advice of an expert or a local pool company in your neighborhood. Doing this will allow you to know the right materials and equipment to use for the painting, plus other crucial things you need to be aware of before getting started.
Pick a good time for the painting
Another thing that cannot be ignored is the weather condition of your location. It’s not ideal to paint your pool under intense sunlight. This will predispose the paint to quick dryness by making it evaporate fast, which will eventually bubble and blister, then begin to develop cracks.
It will also cause poor adhesion as the individual chemical of the paint will not adhere properly.
The humidity level is also a disadvantage as this can cause debris to stay on the surface of the pool. Therefore, the best time to paint is when the weather has a low humidity level devoid of rain or snow.
Preparation Tips

- You must take adequate precautions during the whole process. The use of hand gloves and safety goggles is mandatory; you can also use a nose mask if you don't like the smell of paint
- Pets and children should be kept away from the pool during the painting process
- Endeavor to mix the paint thoroughly as recommended by the manufacturer
- Sandblast the surface of the pool before painting. This will give you a smoother and easy surface to work with
- Painting allows you to inspect the pool and check for cracks that need to be repaired. Shallow cracks can be filled with paint while deeper cracks can be filled with hydraulic cement. It is, however, advisable to seek professional help when there's a major crack
- For parts that cannot be reached with a paint roller, use paintbrushes to ensure that a neat job is done
Materials Required for Pool Painting
Epoxy/acrylic/chlorinated rubber paint

Image credit: resin-expert.com
These are the various sets of special paints used to paint a pool, depending on the type of pool. They’re not like regular paints because of the materials they are made from. Pool paints are usually waterproof, aid adhesion, and dry faster.
Using any of the aforementioned paint will help you to achieve a satisfactory painting job for your pool. However, you must determine the right type of paint your pool needs to get the best result.
Paint roller pans, paint roller extensions and paint brushes
These are the various pieces of equipment used in mixing, painting the sides of the pool, and painting the corners or where the roller cannot reach respectively.
Power washer
You need this to mechanically wash off debris, dirt, grime, and any unwanted substance off the pool.
Scraper
The scraper is used for scraping off old paint residue and flakes from the walls of the pool. It can also be used to take samples of the previous paint to a local pool painter to determine the right type of paint that can be used to repaint your pool.
Rubber gloves and safety goggles
These are materials that can be used as protective measures against the harsh and corrosive/burning properties of the chemical constituents of the paint.

Muriatic acid
It is also known as hydrochloric acid. It is a chemical pH reducer used in its diluted form for maintaining the alkalinity balance of the pool. Aside from that, it is a very useful stain remover for pools.
Tri-sodium phosphate
This is also known as an effective cleansing agent that’s often employed for the removal of flakes or paint residues that won't allow a new coat to bond.
Masking Tapes
They’re used for covering areas of the pool that require no painting. They can also be used to create lovely shapes, designs, and patterns during painting.
A Step-by-Step Guide on How to Paint a Pool

Image credit: theofy.world
Below are the steps to take for a neat and professional painting job on your pool. Follow the steps after choosing the right paint and getting the required tools and materials.
1. Prepare the pool for painting
This is done by identifying the suitable paint for your pool, choosing the best day or week with the right or ideal weather condition for your painting, and checking for cracks or damages and repairing them.
2. Drain the pool
A submersible pump is a perfect tool for draining the pool up until the level where the pump suction cannot reach. You then use a broom to sweep the water towards the pump. A wet vacuum can later be used for the removal of any water and debris that cannot be drained by the pump.
3. Thoroughly clean the pool
Certain paint types, most especially acrylic paint, often show the blisters under them due to their thin nature. You must, therefore, remove any existing dirt, grime, or paint flakes to avoid having a rough surface after painting and to aid the adhesion of paint particles to the surface of the pool.
After that, use the scraper to remove the underlying paint and thoroughly wash the surface with tri-sodium phosphate and/or muriatic acid. You then rinse off the acid solution with a large amount of water, which will later be drained by the submersible pump.
4. Paint the sides of the pool
This is the main part of the whole process. The actual painting starts after you’ve successfully cleaned and removed any flake and stain from the surface of the pool. It’s best to start painting from the sides.
Areas that don’t need painting should be taped with waterproof pool tape. The stairs of the pool are the most obvious parts of the pool and are highly susceptible to abrasion. Therefore, they should be given more attention and coating.
For a pool that has never been painted, it's important to first apply primer as an underlying coat. This is required because primer conditions the fast adhesion of the paint to the pool's surface. Then, it is mandatory to leave the surface to dry for about 24 hours after the primer application. Previously coated pools don’t necessarily need primers.
The thorough mixing of the paint is done either by the use of paint buckets or paint gallons, depending on what you find convenient. It is also worthy to note that the paint must be of a moderate texture; neither too thin nor too thick.
Thick paint sags minutes after application. It bubbles and causes blisters, which eventually lead to breakage. Thin paint also exposes the underlying rough and unattractive surface of the pool. And it’s often not long-lasting.
5. Paint the floor of the pool
A vital thing to note here is that painting should be done outwards from the deepest section to the shallowest part. This is to avoid stepping on the already painted sections. Hence, it is best to finish on the ladder side. The need for a second coat will be recommended by the paint manufacturer if necessary. Otherwise, allow the paint to dry.
6. Allow drying
Before taking any further step after painting, it is a valid requirement that the pool should be left to properly dry for a period of 7 to 14 days. However, the time difference shouldn't exceed 48 hours when there's a need to apply a second coat. Failure to do that could make you go through the stress of scraping the first layer of coat to aid bonding.
7. Fill with water
Filling the pool with clean and hygienic water is the last step after the paint is completely dry. Adjust the filter and chemical settings to ensure proper maintenance. A painted pool has a ceramic-like finish that impedes algae and resists stain. Therefore, there’s a need to maintain alkalinity and hardness balance by adding a chlorine stabilizer.
In Summary
Proper maintenance and regular painting of your pool will not only make the pool long-lasting but will also improve the aesthetics of your home.


Leave a comment
This site is protected by hCaptcha and the hCaptcha Privacy Policy and Terms of Service apply.